
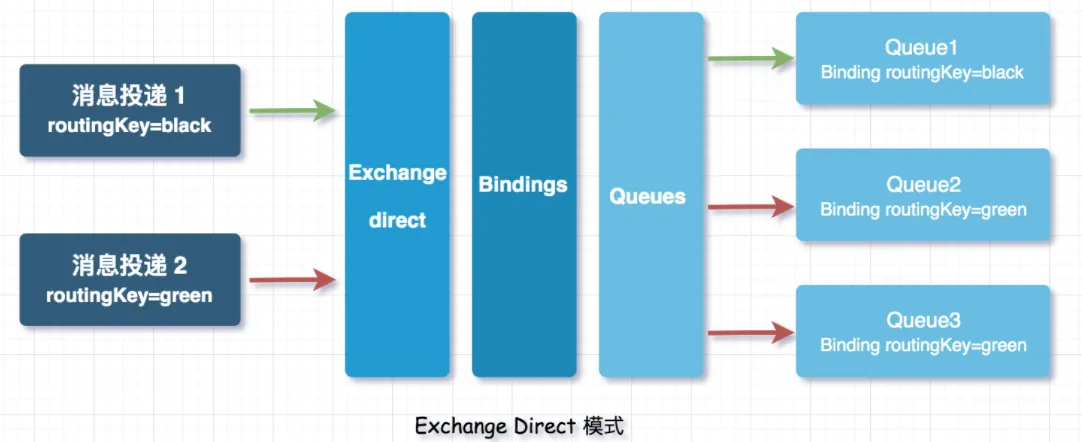
RabbitMQ
RabbitMQ下载和安装
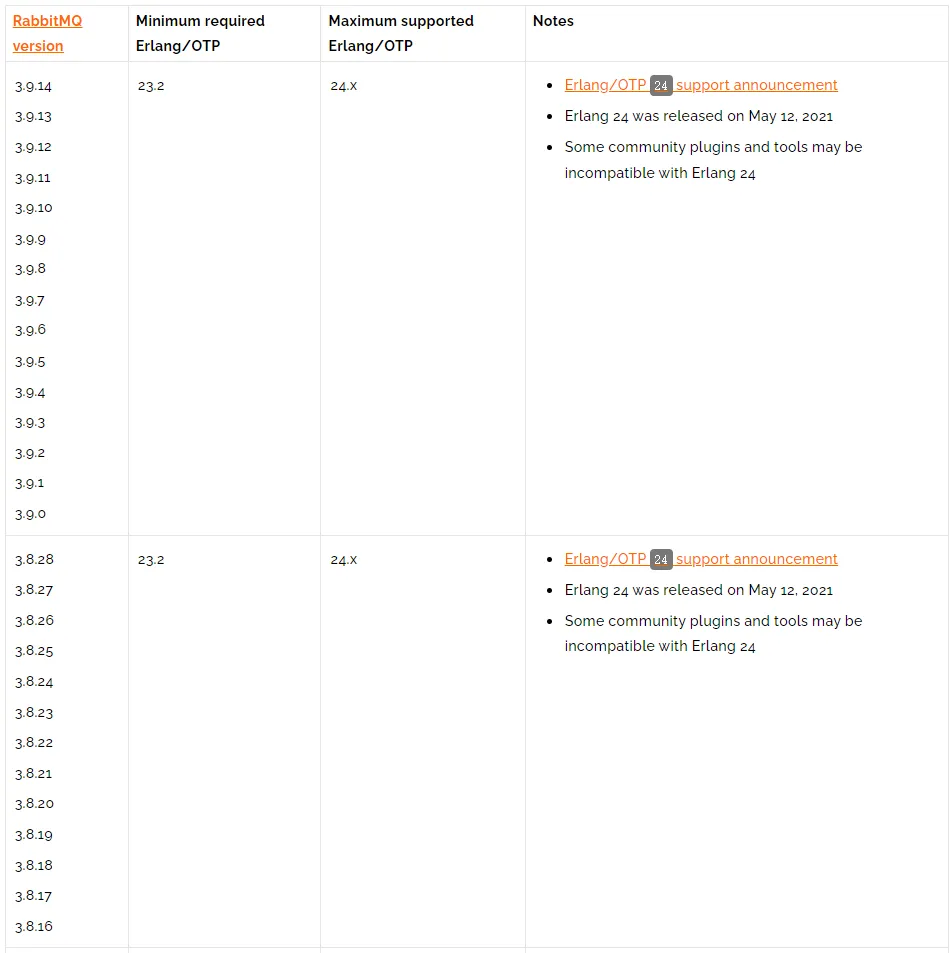
- 版本:3.8.28
- 下载:https://www.rabbitmq.com/download.html
- erlang的版本对照表 :https://www.rabbitmq.com/which-erlang.html
手动安装 - RabbitMQ-Linux安装
官网安装地址:https://www.rabbitmq.com/install-rpm.html
-
安装erlang
官网:https://www.erlang-solutions.com/downloads/
安装地址:https://packagecloud.io/rabbitmq/erlang/install#bash-rpm
Terminal window curl -s https://packagecloud.io/install/repositories/rabbitmq/erlang/script.rpm.sh | sudo bash -
开始安装erlang
Terminal window yum install erlangRunning transaction正在安装 : erlang-23.3.4.11-1.el7.x86_64验证中 : erlang-23.3.4.11-1.el7.x86_64已安装:erlang.x86_64 0:23.3.4.11-1.el7 -
验证是否安装成功
Terminal window > erl> yum list | grep erlang -
RabbitMQ依赖下载
https://packagecloud.io/rabbitmq/rabbitmq-server/install#bash-rpm
Terminal window curl -s https://packagecloud.io/install/repositories/rabbitmq/rabbitmq-server/script.rpm.sh | sudo bash -
下载rabbitmq-noarch
依赖组件
Terminal window rpm --import https://www.rabbitmq.com/rabbitmq-release-signing-key.asc## install these dependencies from standard OS repositoriesyum install socat logrotate -y下载rabbittmq-server的各个版本下载:
- https://www.rabbitmq.com/changelog.html
- 3.2.28版本下载地址:3.2.28版本下载
Terminal window # 下载 建议如果下载太慢就用手动的方式下载在上传wget https://github.com/rabbitmq/rabbitmq-server/releases/download/v3.8.28/rabbitmq-server-3.8.28-1.el7.noarch.rpm# 解压rpm -ivh rabbitmq-server-3.8.28-1.el7.noarch.rpm -
配置rabbitmq-server
Github地址:Github地址
在
/etc/rabbitmq新建一个rabbitmq.conf文件如下:## This example configuration file demonstrates various settings## available via rabbitmq.conf. It primarily focuses core broker settings## but some tier 1 plugin settings are also covered.#### This file is AN EXAMPLE. It is NOT MEANT TO BE USED IN PRODUCTION. Instead of## copying the entire (large!) file, create or generate a new rabbitmq.conf for the target system## and populate it with the necessary settings.#### See https://rabbitmq.com/configure.html to learn about how to configure RabbitMQ,## the ini-style format used by rabbitmq.conf, how it is different from `advanced.config`,## how to verify effective configuration, and so on.#### See https://rabbitmq.com/documentation.html for the rest of RabbitMQ documentation.#### In case you have questions, please use RabbitMQ community Slack and the rabbitmq-users Google group## instead of GitHub issues.# ======================================# Core broker section# ======================================## Networking## ====================#### Related doc guide: https://rabbitmq.com/networking.html.#### By default, RabbitMQ will listen on all interfaces, using## the standard (reserved) AMQP 0-9-1 and 1.0 port.### listeners.tcp.default = 5672## To listen on a specific interface, provide an IP address with port.## For example, to listen only on localhost for both IPv4 and IPv6:### IPv4# listeners.tcp.local = 127.0.0.1:5672# IPv6# listeners.tcp.local_v6 = ::1:5672## You can define multiple listeners using listener names# listeners.tcp.other_port = 5673# listeners.tcp.other_ip = 10.10.10.10:5672## TLS listeners are configured in the same fashion as TCP listeners,## including the option to control the choice of interface.### listeners.ssl.default = 5671## It is possible to disable regular TCP (non-TLS) listeners. Clients## not configured to use TLS and the correct TLS-enabled port won't be able## to connect to this node.# listeners.tcp = none## Number of Erlang processes that will accept connections for the TCP## and TLS listeners.### num_acceptors.tcp = 10# num_acceptors.ssl = 10## Socket writer will force GC every so many bytes transferred.## Default is 1 GiB (`1000000000`). Set to 'off' to disable.### socket_writer.gc_threshold = 1000000000### To disable:# socket_writer.gc_threshold = off## Maximum amount of time allowed for the AMQP 0-9-1 and AMQP 1.0 handshake## (performed after socket connection and TLS handshake) to complete, in milliseconds.### handshake_timeout = 10000## Set to 'true' to perform reverse DNS lookups when accepting a## connection. rabbitmqctl and management UI will then display hostnames## instead of IP addresses. Default value is `false`.### reverse_dns_lookups = false#### Security, Access Control## ==============#### Related doc guide: https://rabbitmq.com/access-control.html.## The default "guest" user is only permitted to access the server## via a loopback interface (e.g. localhost).## {loopback_users, [<<"guest">>]},### loopback_users.guest = true## Uncomment the following line if you want to allow access to the## guest user from anywhere on the network.# loopback_users.guest = false## TLS configuration.#### Related doc guide: https://rabbitmq.com/ssl.html.### listeners.ssl.1 = 5671## ssl_options.verify = verify_peer# ssl_options.fail_if_no_peer_cert = false# ssl_options.cacertfile = /path/to/cacert.pem# ssl_options.certfile = /path/to/cert.pem# ssl_options.keyfile = /path/to/key.pem## ssl_options.honor_cipher_order = true# ssl_options.honor_ecc_order = true### These are highly recommended for TLSv1.2 but cannot be used## with TLSv1.3. If TLSv1.3 is enabled, these lines MUST be removed.# ssl_options.client_renegotiation = false# ssl_options.secure_renegotiate = true### Limits what TLS versions the server enables for client TLS## connections. See https://www.rabbitmq.com/ssl.html#tls-versions for details.#### Cutting edge TLS version which requires recent client runtime## versions and has no cipher suite in common with earlier TLS versions.# ssl_options.versions.1 = tlsv1.3## Enables TLSv1.2 for best compatibility# ssl_options.versions.2 = tlsv1.2## Older TLS versions have known vulnerabilities and are being phased out## from wide use.## Limits what cipher suites the server will use for client TLS## connections. Narrowing this down can prevent some clients## from connecting.## If TLSv1.3 is enabled and cipher suites are overridden, TLSv1.3-specific## cipher suites must also be explicitly enabled.## See https://www.rabbitmq.com/ssl.html#cipher-suites and https://wiki.openssl.org/index.php/TLS1.3#Ciphersuites## for details.### The example below uses TLSv1.3 cipher suites only## ssl_options.ciphers.1 = TLS_AES_256_GCM_SHA384# ssl_options.ciphers.2 = TLS_AES_128_GCM_SHA256# ssl_options.ciphers.3 = TLS_CHACHA20_POLY1305_SHA256# ssl_options.ciphers.4 = TLS_AES_128_CCM_SHA256# ssl_options.ciphers.5 = TLS_AES_128_CCM_8_SHA256### The example below uses TLSv1.2 cipher suites only## ssl_options.ciphers.1 = ECDHE-ECDSA-AES256-GCM-SHA384# ssl_options.ciphers.2 = ECDHE-RSA-AES256-GCM-SHA384# ssl_options.ciphers.3 = ECDHE-ECDSA-AES256-SHA384# ssl_options.ciphers.4 = ECDHE-RSA-AES256-SHA384# ssl_options.ciphers.5 = ECDH-ECDSA-AES256-GCM-SHA384# ssl_options.ciphers.6 = ECDH-RSA-AES256-GCM-SHA384# ssl_options.ciphers.7 = ECDH-ECDSA-AES256-SHA384# ssl_options.ciphers.8 = ECDH-RSA-AES256-SHA384# ssl_options.ciphers.9 = DHE-RSA-AES256-GCM-SHA384# ssl_options.ciphers.10 = DHE-DSS-AES256-GCM-SHA384# ssl_options.ciphers.11 = DHE-RSA-AES256-SHA256# ssl_options.ciphers.12 = DHE-DSS-AES256-SHA256# ssl_options.ciphers.13 = ECDHE-ECDSA-AES128-GCM-SHA256# ssl_options.ciphers.14 = ECDHE-RSA-AES128-GCM-SHA256# ssl_options.ciphers.15 = ECDHE-ECDSA-AES128-SHA256# ssl_options.ciphers.16 = ECDHE-RSA-AES128-SHA256# ssl_options.ciphers.17 = ECDH-ECDSA-AES128-GCM-SHA256# ssl_options.ciphers.18 = ECDH-RSA-AES128-GCM-SHA256# ssl_options.ciphers.19 = ECDH-ECDSA-AES128-SHA256# ssl_options.ciphers.20 = ECDH-RSA-AES128-SHA256# ssl_options.ciphers.21 = DHE-RSA-AES128-GCM-SHA256# ssl_options.ciphers.22 = DHE-DSS-AES128-GCM-SHA256# ssl_options.ciphers.23 = DHE-RSA-AES128-SHA256# ssl_options.ciphers.24 = DHE-DSS-AES128-SHA256# ssl_options.ciphers.25 = ECDHE-ECDSA-AES256-SHA# ssl_options.ciphers.26 = ECDHE-RSA-AES256-SHA# ssl_options.ciphers.27 = DHE-RSA-AES256-SHA# ssl_options.ciphers.28 = DHE-DSS-AES256-SHA# ssl_options.ciphers.29 = ECDH-ECDSA-AES256-SHA# ssl_options.ciphers.30 = ECDH-RSA-AES256-SHA# ssl_options.ciphers.31 = ECDHE-ECDSA-AES128-SHA# ssl_options.ciphers.32 = ECDHE-RSA-AES128-SHA# ssl_options.ciphers.33 = DHE-RSA-AES128-SHA# ssl_options.ciphers.34 = DHE-DSS-AES128-SHA# ssl_options.ciphers.35 = ECDH-ECDSA-AES128-SHA# ssl_options.ciphers.36 = ECDH-RSA-AES128-SHA# ssl_options.bypass_pem_cache = true## Select an authentication/authorisation backend to use.#### Alternative backends are provided by plugins, such as rabbitmq-auth-backend-ldap.#### NB: These settings require certain plugins to be enabled.#### Related doc guides:#### * https://rabbitmq.com/plugins.html## * https://rabbitmq.com/access-control.html### auth_backends.1 = rabbit_auth_backend_internal## uses separate backends for authentication and authorisation,## see below.# auth_backends.1.authn = rabbit_auth_backend_ldap# auth_backends.1.authz = rabbit_auth_backend_internal## The rabbitmq_auth_backend_ldap plugin allows the broker to## perform authentication and authorisation by deferring to an## external LDAP server.#### Relevant doc guides:#### * https://rabbitmq.com/ldap.html## * https://rabbitmq.com/access-control.html#### uses LDAP for both authentication and authorisation# auth_backends.1 = rabbit_auth_backend_ldap## uses HTTP service for both authentication and## authorisation# auth_backends.1 = rabbit_auth_backend_http## uses two backends in a chain: HTTP first, then internal# auth_backends.1 = rabbit_auth_backend_http# auth_backends.2 = rabbit_auth_backend_internal## Authentication## The built-in mechanisms are 'PLAIN',## 'AMQPLAIN', and 'EXTERNAL' Additional mechanisms can be added via## plugins.#### Related doc guide: https://rabbitmq.com/authentication.html.### auth_mechanisms.1 = PLAIN# auth_mechanisms.2 = AMQPLAIN## The rabbitmq-auth-mechanism-ssl plugin makes it possible to## authenticate a user based on the client's x509 (TLS) certificate.## Related doc guide: https://rabbitmq.com/authentication.html.#### To use auth-mechanism-ssl, the EXTERNAL mechanism should## be enabled:### auth_mechanisms.1 = PLAIN# auth_mechanisms.2 = AMQPLAIN# auth_mechanisms.3 = EXTERNAL## To force x509 certificate-based authentication on all clients,## exclude all other mechanisms (note: this will disable password-based## authentication even for the management UI!):### auth_mechanisms.1 = EXTERNAL## This pertains to both the rabbitmq-auth-mechanism-ssl plugin and## STOMP ssl_cert_login configurations. See the RabbitMQ STOMP plugin## configuration section later in this file and the README in## https://github.com/rabbitmq/rabbitmq-auth-mechanism-ssl for further## details.#### To use the TLS cert's CN instead of its DN as the username### ssl_cert_login_from = common_name## TLS handshake timeout, in milliseconds.### ssl_handshake_timeout = 5000#### Loading Definitions## ====================#### Relevant documentation: https://www.rabbitmq.com/definitions.html#import-on-boot#### To import definitions from a local file on node boot, set the## load_definitions config key to a path of a previously exported## JSON file with definitions. Does not require management plugin## to be enabled.### load_definitions = /path/to/definitions/file.json#### Cluster name## ====================### cluster_name = dev3.eng.megacorp.local## Password hashing implementation. Will only affect newly## created users. To recalculate hash for an existing user## it's necessary to update her password.#### To use SHA-512, set to rabbit_password_hashing_sha512.### password_hashing_module = rabbit_password_hashing_sha256## When importing definitions exported from versions earlier## than 3.6.0, it is possible to go back to MD5 (only do this## as a temporary measure!) by setting this to rabbit_password_hashing_md5.### password_hashing_module = rabbit_password_hashing_md5#### Default User / VHost## ====================#### On first start RabbitMQ will create a vhost and a user. These## config items control what gets created.## Relevant doc guide: https://rabbitmq.com/access-control.html### default_vhost = /# default_user = guest# default_pass = guest# default_permissions.configure = .*# default_permissions.read = .*# default_permissions.write = .*## Tags for default user#### For more details about tags, see the documentation for the## Management Plugin at https://rabbitmq.com/management.html.### default_user_tags.administrator = true## Define other tags like this:# default_user_tags.management = true# default_user_tags.custom_tag = true#### Additional network and protocol related configuration## =====================================================#### Set the server AMQP 0-9-1 heartbeat timeout in seconds.## RabbitMQ nodes will send heartbeat frames at roughly## the (timeout / 2) interval. Two missed heartbeats from## a client will close its connection.#### Values lower than 6 seconds are very likely to produce## false positives and are not recommended.#### Related doc guides:#### * https://rabbitmq.com/heartbeats.html## * https://rabbitmq.com/networking.html### heartbeat = 60## Set the max permissible size of an AMQP frame (in bytes).### frame_max = 131072## Set the max frame size the server will accept before connection## tuning occurs### initial_frame_max = 4096## Set the max permissible number of channels per connection.## 0 means "no limit".### channel_max = 128## Customising TCP Listener (Socket) Configuration.#### Related doc guides:#### * https://rabbitmq.com/networking.html## * https://www.erlang.org/doc/man/inet.html#setopts-2### tcp_listen_options.backlog = 128# tcp_listen_options.nodelay = true# tcp_listen_options.exit_on_close = false## tcp_listen_options.keepalive = true# tcp_listen_options.send_timeout = 15000## tcp_listen_options.buffer = 196608# tcp_listen_options.sndbuf = 196608# tcp_listen_options.recbuf = 196608#### Resource Limits & Flow Control## ==============================#### Related doc guide: https://rabbitmq.com/memory.html.## Memory-based Flow Control threshold.### vm_memory_high_watermark.relative = 0.4## Alternatively, we can set a limit (in bytes) of RAM used by the node.### vm_memory_high_watermark.absolute = 1073741824## Or you can set absolute value using memory units (with RabbitMQ 3.6.0+).## Absolute watermark will be ignored if relative is defined!### vm_memory_high_watermark.absolute = 2GB#### Supported unit symbols:#### k, kiB: kibibytes (2^10 - 1,024 bytes)## M, MiB: mebibytes (2^20 - 1,048,576 bytes)## G, GiB: gibibytes (2^30 - 1,073,741,824 bytes)## kB: kilobytes (10^3 - 1,000 bytes)## MB: megabytes (10^6 - 1,000,000 bytes)## GB: gigabytes (10^9 - 1,000,000,000 bytes)## Fraction of the high watermark limit at which queues start to## page message out to disc in order to free up memory.## For example, when vm_memory_high_watermark is set to 0.4 and this value is set to 0.5,## paging can begin as early as when 20% of total available RAM is used by the node.#### Values greater than 1.0 can be dangerous and should be used carefully.#### One alternative to this is to use durable queues and publish messages## as persistent (delivery mode = 2). With this combination queues will## move messages to disk much more rapidly.#### Another alternative is to configure queues to page all messages (both## persistent and transient) to disk as quickly## as possible, see https://rabbitmq.com/lazy-queues.html.### vm_memory_high_watermark_paging_ratio = 0.5## Selects Erlang VM memory consumption calculation strategy. Can be `allocated`, `rss` or `legacy` (aliased as `erlang`),## Introduced in 3.6.11. `rss` is the default as of 3.6.12.## See https://github.com/rabbitmq/rabbitmq-server/issues/1223 and rabbitmq/rabbitmq-common#224 for background.# vm_memory_calculation_strategy = rss## Interval (in milliseconds) at which we perform the check of the memory## levels against the watermarks.### memory_monitor_interval = 2500## The total memory available can be calculated from the OS resources## - default option - or provided as a configuration parameter.# total_memory_available_override_value = 2GB## Set disk free limit (in bytes). Once free disk space reaches this## lower bound, a disk alarm will be set - see the documentation## listed above for more details.#### Absolute watermark will be ignored if relative is defined!# disk_free_limit.absolute = 50000## Or you can set it using memory units (same as in vm_memory_high_watermark)## with RabbitMQ 3.6.0+.# disk_free_limit.absolute = 500KB# disk_free_limit.absolute = 50mb# disk_free_limit.absolute = 5GB## Alternatively, we can set a limit relative to total available RAM.#### Values lower than 1.0 can be dangerous and should be used carefully.# disk_free_limit.relative = 2.0#### Clustering## =====================### cluster_partition_handling = ignore## Pauses all nodes on the minority side of a partition. The cluster## MUST have an odd number of nodes (3, 5, etc)# cluster_partition_handling = pause_minority## pause_if_all_down strategy require additional configuration# cluster_partition_handling = pause_if_all_down## Recover strategy. Can be either 'autoheal' or 'ignore'# cluster_partition_handling.pause_if_all_down.recover = ignore## Node names to check# cluster_partition_handling.pause_if_all_down.nodes.1 = rabbit@localhost# cluster_partition_handling.pause_if_all_down.nodes.2 = hare@localhost## Mirror sync batch size, in messages. Increasing this will speed## up syncing but total batch size in bytes must not exceed 2 GiB.## Available in RabbitMQ 3.6.0 or later.### mirroring_sync_batch_size = 4096## Make clustering happen *automatically* at startup. Only applied## to nodes that have just been reset or started for the first time.#### Relevant doc guide: https://rabbitmq.com//cluster-formation.html### cluster_formation.peer_discovery_backend = rabbit_peer_discovery_classic_config## cluster_formation.classic_config.nodes.1 = rabbit1@hostname# cluster_formation.classic_config.nodes.2 = rabbit2@hostname# cluster_formation.classic_config.nodes.3 = rabbit3@hostname# cluster_formation.classic_config.nodes.4 = rabbit4@hostname## DNS-based peer discovery. This backend will list A records## of the configured hostname and perform reverse lookups for## the addresses returned.# cluster_formation.peer_discovery_backend = rabbit_peer_discovery_dns# cluster_formation.dns.hostname = discovery.eng.example.local## This node's type can be configured. If you are not sure## what node type to use, always use 'disc'.# cluster_formation.node_type = disc## Interval (in milliseconds) at which we send keepalive messages## to other cluster members. Note that this is not the same thing## as net_ticktime; missed keepalive messages will not cause nodes## to be considered down.### cluster_keepalive_interval = 10000#### Statistics Collection## =====================#### Statistics collection interval (in milliseconds). Increasing## this will reduce the load on management database.### collect_statistics_interval = 5000## Fine vs. coarse statistics## This value is no longer meant to be configured directly.## See https://www.rabbitmq.com/management.html#fine-stats.#### Ra Settings## =====================### raft.segment_max_entries = 65536# raft.wal_max_size_bytes = 1048576# raft.wal_max_batch_size = 4096# raft.snapshot_chunk_size = 1000000#### Misc/Advanced Options## =====================#### NB: Change these only if you understand what you are doing!#### Timeout used when waiting for Mnesia tables in a cluster to## become available.### mnesia_table_loading_retry_timeout = 30000## Retries when waiting for Mnesia tables in the cluster startup. Note that## this setting is not applied to Mnesia upgrades or node deletions.### mnesia_table_loading_retry_limit = 10## Size in bytes below which to embed messages in the queue index.## Related doc guide: https://rabbitmq.com/persistence-conf.html### queue_index_embed_msgs_below = 4096## You can also set this size in memory units### queue_index_embed_msgs_below = 4kb## Whether or not to enable background periodic forced GC runs for all## Erlang processes on the node in "waiting" state.#### Disabling background GC may reduce latency for client operations,## keeping it enabled may reduce median RAM usage by the binary heap## (see https://www.erlang-solutions.com/blog/erlang-garbage-collector.html).#### Before trying this option, please take a look at the memory## breakdown (https://www.rabbitmq.com/memory-use.html).### background_gc_enabled = false## Target (desired) interval (in milliseconds) at which we run background GC.## The actual interval will vary depending on how long it takes to execute## the operation (can be higher than this interval). Values less than## 30000 milliseconds are not recommended.### background_gc_target_interval = 60000## Whether or not to enable proxy protocol support.## Once enabled, clients cannot directly connect to the broker## anymore. They must connect through a load balancer that sends the## proxy protocol header to the broker at connection time.## This setting applies only to AMQP clients, other protocols## like MQTT or STOMP have their own setting to enable proxy protocol.## See the plugins documentation for more information.### proxy_protocol = false## Overriden product name and version.## They are set to "RabbitMQ" and the release version by default.# product.name = RabbitMQ# product.version = 1.2.3## "Message of the day" file.## Its content is used to expand the logged and printed banners.## Default to /etc/rabbitmq/motd on Unix, %APPDATA%\RabbitMQ\motd.txt## on Windows.# motd_file = /etc/rabbitmq/motd## Consumer timeout## If a message delivered to a consumer has not been acknowledge before this timer## triggers the channel will be force closed by the broker. This ensure that## faultly consumers that never ack will not hold on to messages indefinitely.### consumer_timeout = 900000## ----------------------------------------------------------------------------## Advanced Erlang Networking/Clustering Options.#### Related doc guide: https://rabbitmq.com/clustering.html## ----------------------------------------------------------------------------# ======================================# Kernel section# ======================================## Timeout used to detect peer unavailability, including CLI tools.## Related doc guide: https://www.rabbitmq.com/nettick.html.### net_ticktime = 60## Inter-node communication port range.## The parameters inet_dist_listen_min and inet_dist_listen_max## can be configured in the classic config format only.## Related doc guide: https://www.rabbitmq.com/networking.html#epmd-inet-dist-port-range.## ----------------------------------------------------------------------------## RabbitMQ Management Plugin#### Related doc guide: https://rabbitmq.com/management.html.## ----------------------------------------------------------------------------# =======================================# Management section# =======================================## Preload schema definitions from the following JSON file.## Related doc guide: https://rabbitmq.com/management.html#load-definitions.### management.load_definitions = /path/to/exported/definitions.json## Log all requests to the management HTTP API to a file.### management.http_log_dir = /path/to/access.log## HTTP listener and embedded Web server settings.# ## See https://rabbitmq.com/management.html for details.## management.tcp.port = 15672# management.tcp.ip = 0.0.0.0## management.tcp.shutdown_timeout = 7000# management.tcp.max_keepalive = 120# management.tcp.idle_timeout = 120# management.tcp.inactivity_timeout = 120# management.tcp.request_timeout = 120# management.tcp.compress = true## HTTPS listener settings.## See https://rabbitmq.com/management.html and https://rabbitmq.com/ssl.html for details.### management.ssl.port = 15671# management.ssl.cacertfile = /path/to/ca_certificate.pem# management.ssl.certfile = /path/to/server_certificate.pem# management.ssl.keyfile = /path/to/server_key.pem## More TLS options# management.ssl.honor_cipher_order = true# management.ssl.honor_ecc_order = true## These are highly recommended for TLSv1.2 but cannot be used## with TLSv1.3. If TLSv1.3 is enabled, these lines MUST be removed.# management.ssl.client_renegotiation = false# management.ssl.secure_renegotiate = true## Supported TLS versions# management.ssl.versions.1 = tlsv1.2## Cipher suites the server is allowed to use# management.ssl.ciphers.1 = ECDHE-ECDSA-AES256-GCM-SHA384# management.ssl.ciphers.2 = ECDHE-RSA-AES256-GCM-SHA384# management.ssl.ciphers.3 = ECDHE-ECDSA-AES256-SHA384# management.ssl.ciphers.4 = ECDHE-RSA-AES256-SHA384# management.ssl.ciphers.5 = ECDH-ECDSA-AES256-GCM-SHA384# management.ssl.ciphers.6 = ECDH-RSA-AES256-GCM-SHA384# management.ssl.ciphers.7 = ECDH-ECDSA-AES256-SHA384# management.ssl.ciphers.8 = ECDH-RSA-AES256-SHA384# management.ssl.ciphers.9 = DHE-RSA-AES256-GCM-SHA384## URL path prefix for HTTP API and management UI# management.path_prefix = /a-prefix## One of 'basic', 'detailed' or 'none'. See## https://rabbitmq.com/management.html#fine-stats for more details.# management.rates_mode = basic## Configure how long aggregated data (such as message rates and queue## lengths) is retained. Please read the plugin's documentation in## https://rabbitmq.com/management.html#configuration for more## details.## Your can use 'minute', 'hour' and 'day' keys or integer key (in seconds)# management.sample_retention_policies.global.minute = 5# management.sample_retention_policies.global.hour = 60# management.sample_retention_policies.global.day = 1200# management.sample_retention_policies.basic.minute = 5# management.sample_retention_policies.basic.hour = 60# management.sample_retention_policies.detailed.10 = 5## ----------------------------------------------------------------------------## RabbitMQ Shovel Plugin#### Related doc guide: https://rabbitmq.com/shovel.html## ----------------------------------------------------------------------------## See advanced.config.example for a Shovel plugin example## ----------------------------------------------------------------------------## RabbitMQ STOMP Plugin#### Related doc guide: https://rabbitmq.com/stomp.html## ----------------------------------------------------------------------------# =======================================# STOMP section# =======================================## See https://rabbitmq.com/stomp.html for details.## TCP listeners.### stomp.listeners.tcp.1 = 127.0.0.1:61613# stomp.listeners.tcp.2 = ::1:61613## TCP listener settings### stomp.tcp_listen_options.backlog = 2048# stomp.tcp_listen_options.recbuf = 131072# stomp.tcp_listen_options.sndbuf = 131072## stomp.tcp_listen_options.keepalive = true# stomp.tcp_listen_options.nodelay = true## stomp.tcp_listen_options.exit_on_close = true# stomp.tcp_listen_options.send_timeout = 120000## Proxy protocol support### stomp.proxy_protocol = false## TLS listeners## See https://rabbitmq.com/stomp.html and https://rabbitmq.com/ssl.html for details.# stomp.listeners.ssl.default = 61614## ssl_options.cacertfile = path/to/cacert.pem# ssl_options.certfile = path/to/cert.pem# ssl_options.keyfile = path/to/key.pem# ssl_options.verify = verify_peer# ssl_options.fail_if_no_peer_cert = true## Number of Erlang processes that will accept connections for the TCP## and TLS listeners.### stomp.num_acceptors.tcp = 10# stomp.num_acceptors.ssl = 1## Additional TLS options## Extract a name from the client's certificate when using TLS.### stomp.ssl_cert_login = true## Set a default user name and password. This is used as the default login## whenever a CONNECT frame omits the login and passcode headers.#### Please note that setting this will allow clients to connect without## authenticating!### stomp.default_user = guest# stomp.default_pass = guest## If a default user is configured, or you have configured use TLS client## certificate based authentication, you can choose to allow clients to## omit the CONNECT frame entirely. If set to true, the client is## automatically connected as the default user or user supplied in the## TLS certificate whenever the first frame sent on a session is not a## CONNECT frame.### stomp.implicit_connect = true## Whether or not to enable proxy protocol support.## Once enabled, clients cannot directly connect to the broker## anymore. They must connect through a load balancer that sends the## proxy protocol header to the broker at connection time.## This setting applies only to STOMP clients, other protocols## like MQTT or AMQP have their own setting to enable proxy protocol.## See the plugins or broker documentation for more information.### stomp.proxy_protocol = false## ----------------------------------------------------------------------------## RabbitMQ MQTT Adapter#### See https://github.com/rabbitmq/rabbitmq-mqtt/blob/stable/README.md## for details## ----------------------------------------------------------------------------# =======================================# MQTT section# =======================================## TCP listener settings.### mqtt.listeners.tcp.1 = 127.0.0.1:61613# mqtt.listeners.tcp.2 = ::1:61613## TCP listener options (as per the broker configuration).### mqtt.tcp_listen_options.backlog = 4096# mqtt.tcp_listen_options.recbuf = 131072# mqtt.tcp_listen_options.sndbuf = 131072## mqtt.tcp_listen_options.keepalive = true# mqtt.tcp_listen_options.nodelay = true## mqtt.tcp_listen_options.exit_on_close = true# mqtt.tcp_listen_options.send_timeout = 120000## TLS listener settings## ## See https://rabbitmq.com/mqtt.html and https://rabbitmq.com/ssl.html for details.## mqtt.listeners.ssl.default = 8883## ssl_options.cacertfile = /path/to/tls/ca_certificate_bundle.pem# ssl_options.certfile = /path/to/tls/server_certificate.pem# ssl_options.keyfile = /path/to/tls/server_key.pem# ssl_options.verify = verify_peer# ssl_options.fail_if_no_peer_cert = true### Number of Erlang processes that will accept connections for the TCP## and TLS listeners.### mqtt.num_acceptors.tcp = 10# mqtt.num_acceptors.ssl = 10## Whether or not to enable proxy protocol support.## Once enabled, clients cannot directly connect to the broker## anymore. They must connect through a load balancer that sends the## proxy protocol header to the broker at connection time.## This setting applies only to STOMP clients, other protocols## like STOMP or AMQP have their own setting to enable proxy protocol.## See the plugins or broker documentation for more information.### mqtt.proxy_protocol = false## Set the default user name and password used for anonymous connections (when client## provides no credentials). Anonymous connections are highly discouraged!### mqtt.default_user = guest# mqtt.default_pass = guest## Enable anonymous connections. If this is set to false, clients MUST provide## credentials in order to connect. See also the mqtt.default_user/mqtt.default_pass## keys. Anonymous connections are highly discouraged!### mqtt.allow_anonymous = true## If you have multiple vhosts, specify the one to which the## adapter connects.### mqtt.vhost = /## Specify the exchange to which messages from MQTT clients are published.### mqtt.exchange = amq.topic## Specify TTL (time to live) to control the lifetime of non-clean sessions.### mqtt.subscription_ttl = 1800000## Set the prefetch count (governing the maximum number of unacknowledged## messages that will be delivered).### mqtt.prefetch = 10## Sets the durable queue type to be used for QoS 1 subscriptions.#### Supported types are:#### * classic## * quorum#### IMPORTANT: changing this setting requires all existing queues used by## the MQTT plugin to be DELETED or clients will fail to subscribe.## So this setting should be used for new clusters.### mqtt.durable_queue_type = classic## ----------------------------------------------------------------------------## RabbitMQ AMQP 1.0 Support#### See https://github.com/rabbitmq/rabbitmq-amqp1.0/blob/stable/README.md.## ----------------------------------------------------------------------------# =======================================# AMQP 1.0 section# =======================================## Connections that are not authenticated with SASL will connect as this## account. See the README for more information.#### Please note that setting this will allow clients to connect without## authenticating!### amqp1_0.default_user = guest## Enable protocol strict mode. See the README for more information.### amqp1_0.protocol_strict_mode = false## Logging settings.#### See https://rabbitmq.com/logging.html for details.#### Log directory, taken from the RABBITMQ_LOG_BASE env variable by default.### log.dir = /var/log/rabbitmq## Logging to file. Can be false or a filename.## Default:# log.file = rabbit.log## To disable logging to a file# log.file = false## Log level for file logging### log.file.level = info## File rotation config. No rotation by default.## DO NOT SET rotation date to ''. Leave the value unset if "" is the desired value# log.file.rotation.date = $D0# log.file.rotation.size = 0## Logging to console (can be true or false)### log.console = false## Log level for console logging### log.console.level = info## Logging to the amq.rabbitmq.log exchange (can be true or false)### log.exchange = false## Log level to use when logging to the amq.rabbitmq.log exchange### log.exchange.level = info## ----------------------------------------------------------------------------## RabbitMQ LDAP Plugin#### Related doc guide: https://rabbitmq.com/ldap.html.#### ----------------------------------------------------------------------------# =======================================# LDAP section# =======================================#### Connecting to the LDAP server(s)## ================================#### Specify servers to bind to. You *must* set this in order for the plugin## to work properly.### auth_ldap.servers.1 = your-server-name-goes-here## You can define multiple servers# auth_ldap.servers.2 = your-other-server## Connect to the LDAP server using TLS### auth_ldap.use_ssl = false## Specify the LDAP port to connect to### auth_ldap.port = 389## LDAP connection timeout, in milliseconds or 'infinity'### auth_ldap.timeout = infinity## Or number# auth_ldap.timeout = 500## Enable logging of LDAP queries.## One of## - false (no logging is performed)## - true (verbose logging of the logic used by the plugin)## - network (as true, but additionally logs LDAP network traffic)#### Defaults to false.### auth_ldap.log = false## Also can be true or network# auth_ldap.log = true# auth_ldap.log = network#### Authentication## ==============#### Pattern to convert the username given through AMQP to a DN before## binding### auth_ldap.user_dn_pattern = cn=${username},ou=People,dc=example,dc=com## Alternatively, you can convert a username to a Distinguished## Name via an LDAP lookup after binding. See the documentation for## full details.## When converting a username to a dn via a lookup, set these to## the name of the attribute that represents the user name, and the## base DN for the lookup query.### auth_ldap.dn_lookup_attribute = userPrincipalName# auth_ldap.dn_lookup_base = DC=gopivotal,DC=com## Controls how to bind for authorisation queries and also to## retrieve the details of users logging in without presenting a## password (e.g., SASL EXTERNAL).## One of## - as_user (to bind as the authenticated user - requires a password)## - anon (to bind anonymously)## - {UserDN, Password} (to bind with a specified user name and password)#### Defaults to 'as_user'.### auth_ldap.other_bind = as_user## Or can be more complex:# auth_ldap.other_bind.user_dn = User# auth_ldap.other_bind.password = Password## If user_dn and password defined - other options is ignored.# -----------------------------# Too complex section of LDAP# -----------------------------#### Authorisation## =============#### The LDAP plugin can perform a variety of queries against your## LDAP server to determine questions of authorisation.#### Related doc guide: https://rabbitmq.com/ldap.html#authorisation.## Following configuration should be defined in advanced.config file## DO NOT UNCOMMENT THESE LINES!## Set the query to use when determining vhost access#### {vhost_access_query, {in_group,## "ou=${vhost}-users,ou=vhosts,dc=example,dc=com"}},## Set the query to use when determining resource (e.g., queue) access#### {resource_access_query, {constant, true}},## Set queries to determine which tags a user has#### {tag_queries, []}# ]},# ----------------------------- -
开启rabbitmq图形化界面
Terminal window rabbitmq-plugins enable rabbitmq_management -
启动rabbitmq-server
Terminal window systemctl start rabbitmq-server -
授予用户和密码和权限
Terminal window # 找到rabbitmq的安装目录,bin是执行目录cd /usr/lib/rabbitmq/bin# 添加一个账号和密码rabbitmqctl add_user admin admin# 给账号和密码授予超级管理员角色rabbitmqctl set_user_tags admin administrator -
然后在浏览器访问:
-
安全组开放端口
-
15672:rabbitmqweb界面的端口
-
5672:应用消息发送和消息消费的端口,后续发布和部署的这个端口必须禁止对外。
记住一定要在安全组中开发:15672和5672的端口
-